Home > Classroom Technology > Equipment Check Out > Video Cameras > Overview - Video Camera Check Out
Overview - Video Camera Check Out
How to navigate the Canon video camera, how to access the SD card, and helpful tips when filming.
Quick Links to Sections in this Article:
Camera Buttons
There are three sections on the camera which have buttons: the top, side, and back. Each section is detailed below.Top of the Camera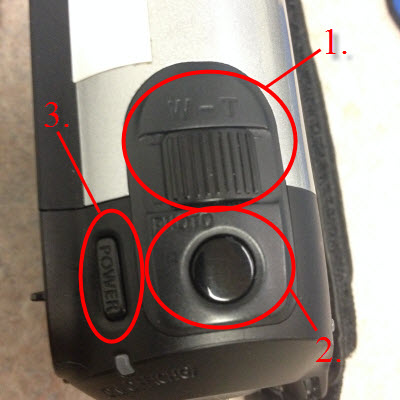
1. W-T Slider
|
For zooming in or out during recording. W = Wide, T = Tight
|
2. Photo Button
|
Simple one-click button for taking photographs
|
3. POWER Button
|
For powering on or off the device
|
Side of the Camera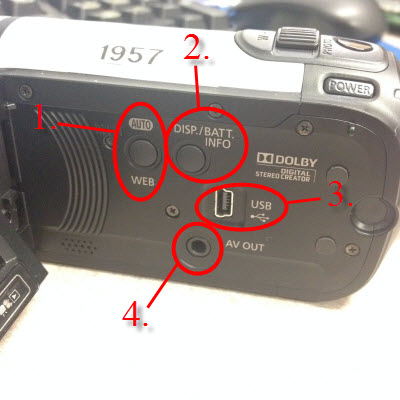
1. AUTO/WEB Button
|
For automatic shooting settings
|
2. DISP./BATT INFO Button
|
Toggles the information displayed on the camera screen.
|
3. USB Port
|
For plugging in a USB cord
|
4. AV Out Plug
|
For the included AV(RCA) cord
|
Back of the Camera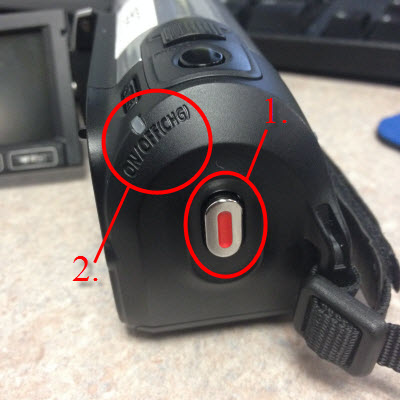
1. Record Button
|
For recording video. Click to begin and click to finish.
|
2. On/OFF(CHG) Indicator
|
Lighted indicator for power or charging status.
|
Screen Buttons
Located on the review screen are multiple buttons and a toggle option. See the image and chart below for details.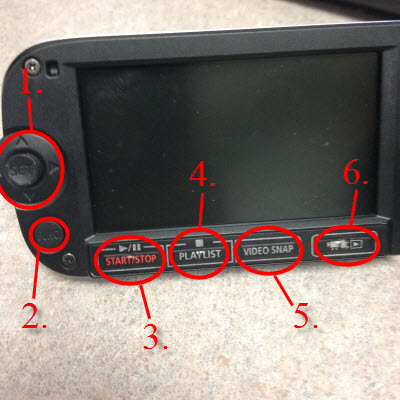
1. Toggle Pad
|
Navigation pad
|
2. FUNC. Button
|
Click to change the current function i.e. video recording
|
3. START/STOP Button
|
For starting and stopping video when reviewing files
|
4. PLAYLIST Button
|
Click to review list of files currently on the SD card
|
5. VIDEO SNAP Button
|
Click to take a still photograph during video playback
|
6. MODE Button
|
Switch between video recording mode and playback mode
|
Locating the SD Card
The SD card is located on the bottom of the camera in a compartment with the battery. It can be removed and replaced with a personal SD card if so desired.
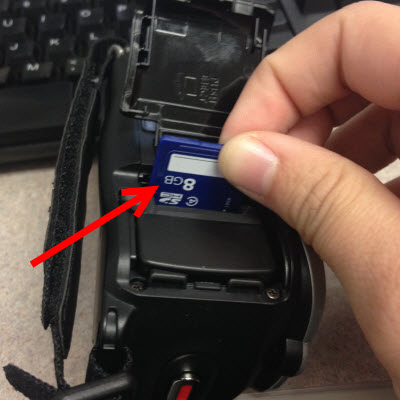
Remember to return the Canon video camera with the original SD card from when you first rented the device.
Helpful Tips
1. When filming, use a tripod or other sturdy surface in order to achieve a steady frame. Tripods are also available for rent through ITS.
2. Try to film in an area with less background noise so as to record crisp clean audio.
3. Avoid filming in low-light or harsh-light situations such as at night, in a dimly lit room, in front of a window, or in a room primarily lit by lamps rather than overhead lighting.
4. Take multiple shorter recordings rather than one long clip, if possible. Using shorter clips breaks up monotony and can be useful for check points if using the video for learning objectives or a group project. It also makes editing easier by shortening search time.
5. Avoid filming subjects from a vantage point beneath eye level. Not only is it unflattering for the individual(s) being filmed but it can also affect visual and audio quality of the recording.
| Author: mitchelld | Last Updated: 7/1/2015 10:34 AM | Page Views: 4603 |
https://helpdesk.etown.edu/helpconsole2012/kb/default.aspx?pageid=overview
|