Home > Classroom Technology > Classrooms/Event Spaces > Esbenshade > Esbenshade 182
Esbenshade 182
Technology Instructions for Esbenshade 182.
If you experience any problems, call ext. 3333 or email the Help Desk
at helpdesk@etown.edu. Please visit our web site at http://www.etown.edu/ITS for additional information.
Quick Links to sections in this article:
Using the Podium Computer
Step 1:Press anywhere on the Crestron Touch Panel to turn on the panel screen.Step 2:
Select Lectern PC. Step 3:
Select Send to All and send the lectern pc to all sources to receive sound and display the computer on the projector.
Note: Wait for the projector to warm up.
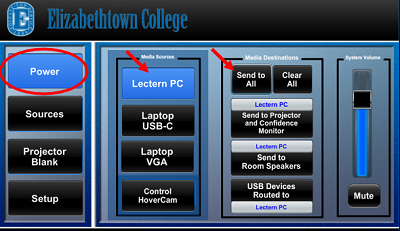 Note: Make sure the USB devices are routed to the correct media source to use the hovercam, webcam, and wireless presenter. Note: Make sure the USB devices are routed to the correct media source to use the hovercam, webcam, and wireless presenter.
Step 4:Press the power button located on the front of the computer and monitor if not already on. Log on with your network username and password.Step 5:The computer screen image will appear on the projection screen.
Warning: Computer resets upon restart and shut down. Save your files to the network or removable media only.
Video - Powering On
Using the Hovercam
Step 1:Select the desired source (either Lectern PC or Laptop USB-C).Step 2:Launch the Zoom meeting on the computer
Step 3:Make
sure the hovercam is on, the power button is located on the top of the hovercam's base.
Step 4:After entering the Zoom call, click the caret at the bottom left-hand of the screen, next to Start Video and select Hovercam
Video - Zoom
Video - Zoom Video Settings
Using a Laptop Computer
Note: It is recommended that you register your laptop on the college network to ensure better connectivity.
Step 1:Connect the USB-C cable to the laptop, found in the cable box on top of the podium.

Step 2:Touch the Laptop USB-C on the screen. Then, select Send to All to send the laptop's video and audio to the room. The projector will automatically turn on.
Note: Wait a few moments for the projector to warm up. Step 3:If you need power, plug your power adapter into the outlet in the cable box.Step 4:Press the Windows key + P and click Duplicate to make the projector display the same as your screen.
Video - USB-C Connection
Classroom Links
Multiple shortcuts are located on the desktop of the lectern pc to change display settings and open classroom instructions.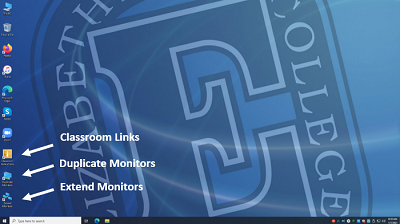 Step 1: Step 1:
To see instructions for the classroom, select the Classroom Instructions shortcut located on the desktop.
Step 2:
Select Duplicate Monitors to show the same screen on the lectern pc and projector screen.
Step 3:
Select Extend Monitors to show different screens on the lectern pc and projector screen.
Properly Turning Off the Projector
Step 1:Turn off the projector by touching the POWER button on the Crestron Touch Screen. You will be prompted, “Are you sure you want to power off the system?” Touch YES.
Step 2:Restart by clicking on the START button at the bottom left of the screen, click the POWER icon, then select the RESTART option. Step 3:If you want to turn on the projector again, give the machine several minutes to cool down before restarting the projector.
Warning: Do NOT turn off the Surge Protector!
Make sure that the projector is turned OFF because it is very expensive to replace the bulb.
| Author: kadens | Last Updated: 5/27/2021 1:27 PM | Page Views: 4104 |
https://helpdesk.etown.edu/helpconsole2012/kb/default.aspx?pageid=esbenshade_182
|