Home > Classroom Technology > Classrooms/Event Spaces > Musser > Musser 232
Musser 232
Technology instructions for Musser 232. If you experience any problems, call ext. 3333 or email the Help Desk at mediaservices@etown.edu. Please visit our Web site at http://www.etown.edu/ITS.
Quick Links to sections in this article:

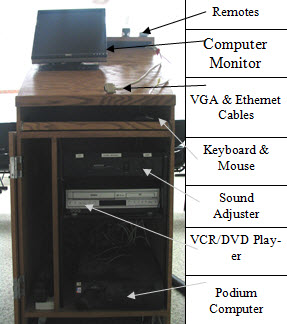
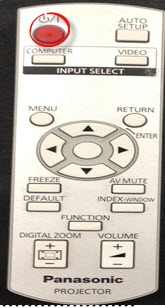
Note: All remote controls should be found on top of the podium. The projector remote control should be pointed at the projector in order to turn it on.
Using the Computer
Step 1:Press the Power button on the remote to turn on the projector.
 Note: Wait a few moments for the projector to warm up. Note: Wait a few moments for the projector to warm up.
Step 2:Press the Power button on the front of the computer and monitor if not already on. Log on with your network username and password. If you are a guest, please contact the department assistant for a username and password. Step 3:The computer image will appear on the projection screen.
Step 4:Turn off the projector and computer when finished. Warning: The computer resets upon restart and shut down. Save your files to the network or removable media only.
Using the Document Camera
Step 1:Press the Power button on the projector remote to turn on the projector.
 Note: Wait a few moments for the projector to warm up.Step 2:Press the Input button on the projector remote until the document camera appears. Step 3:Press the red Power button on the doc cam to turn it on. It should project on screen. If it doesn't, press the CAM/PC1/PC2 button on the doc cam to switch inputs. Note: Wait a few moments for the projector to warm up.Step 2:Press the Input button on the projector remote until the document camera appears. Step 3:Press the red Power button on the doc cam to turn it on. It should project on screen. If it doesn't, press the CAM/PC1/PC2 button on the doc cam to switch inputs.
 Step 4:Use the buttons on the doc cam to adjust the view of your objects. Step 4:Use the buttons on the doc cam to adjust the view of your objects.
Using the VCR/DVD Player
Step 1:Press the Power button on the projector remote to turn on the projector.
 Note: Wait a few moments for the projector to warm up. Note: Wait a few moments for the projector to warm up.
Step 2:Press the Power button on the silver VCR/DVD player to turn it on. Step 3:Press the DVD or VHS button on the VCR/DVD player.
Step 4:Place either a VHS tape in the left or a DVD in the right side of the VCR/DVD player. Step 5:Press the Input button on the projector remote until a blue screen or DVD logo appears on the projection screen.
Step 6:Use the buttons on the VCR/DVD remote when you are ready to play your media.
Using a Laptop Computer
Note: It is recommended that you register your laptop on the college network to ensure better connectivity.
Step 1:Begin with the laptop turned off to connect. Step 2:Connect the VGA cable to the blue port and the Ethernet cable to the network jack on your laptop. The cables are located at the top right corner of the podium. Step 3:Press the Power button on the projector remote to turn on the projector.
 Note: Wait a few moments for the projector to warm up. Note: Wait a few moments for the projector to warm up.
Step 4:Press the Input button on the projector remote until INPUT2 appears on the projection screen. Step 5:Turn on the laptop. If you need power, plug in your power adapter into the outlet at the bottom of the podium cabinet.
Step 6:Press the Windows key + P and click Duplicate to make the projector display the same as your screen.
Properly Turning Off the Projector
Step 1:Turn the computer off by clicking the Start button in the bottom left corner of the screen, then select Shutdown. Choose Shutdown in the dialog box, then click OK. Step 2:Turn the projector off by pressing the Power button twice on the projector remote. You will be prompted by a message on the projection screen.
 Step 3:If you want to turn the projector on again, give the machine several minutes to cool down before restarting it. Make sure that the projector is turned off because it is very expensive to replace the bulb. Step 3:If you want to turn the projector on again, give the machine several minutes to cool down before restarting it. Make sure that the projector is turned off because it is very expensive to replace the bulb.
| Author: karperc | Last Updated: 5/27/2021 1:33 PM | Page Views: 4982 |
https://helpdesk.etown.edu/helpconsole2012/kb/default.aspx?pageid=musser_232
|